
Fiberglass and snap moulds
- leahgaylor
- May 31, 2021
- 3 min read
Updated: Jun 4, 2021
Casting the sculpting head
In order to cast the finished sculpted head piece (figure 1) for image four a fibreglass jacket had to be added. Creating the fibre-glass jacket was an extremely long process due to lengthy drying times, re-coatings, and local lockdowns. The fibreglass jacket would have been completed sooner but due to the university closure during local and national lockdowns it took longer than planned. As the sculpting detail was only on the back of the head (figure 2), a head squish fibreglass mould was completed instead of a full head cast of fibreglass.
Before adding silicone over the mould, an outer rim made with thick tape (figure 3) was constructed around the sculpt to ensure any silicone doesn’t fall away. Multiple thin layers were applied over the sculpted head piece, consisting of around four thin layers and two layers of silicone with polyfibre (figure 4). Debreceni (2013, p.208) writes that the way to “avoid thin spots is to do multiple layers of silicone and tint each batch a different colour so it is easy to see where you’ve already brushed.” Because the sculpt contained lots of fine details it was important for the silicone to capture these bits and help achieve the overall visual effect of the piece.
The next step was the application of an epoxy gel coating to the silicone so that the fibreglass could then be applied (figure 5). The problem when applying the gel coating was that the gel kept dripping, which was because to apply the epoxy gel the head cast had to be positioned upright and gravity pulled the coating downwards. Fibreglass was then applied (figure 6), and is material commonly used in the prosthetics industry as it is reliable and sturdy and so less likely to break. Although Debreceni (2013, p.209) agrees that fibreglass “is extremely lightweight and very tough”, the problem is that it is very dangerous when used incorrectly so when working with the material necessary safety procedures are needed.
Snap moulds
For the nose and chin pieces for image four, snap moulds were created for two prosthetics. The creation of the snap moulds was straight forward with no problems, as this process has been done before by the make-up artist. Problems only started to arise when running the silicone pieces (figure 7), as the cap plastic kept ripping and too much silicone started to flood the bleeding edge. For the completion of the final image the nose piece was used, however the chin piece was a previously used flat mould prosthetic from image one that fit much better.
Running silicone
Running silicone for image four became a problem for the back of the head mould as the silicone would not completely fit the mould. As well as silicone, the makeup artist had to consider colouring the pieces and had already learnt from the colouring mistakes that occurred during the trial and errors for images one and two. Before applying any silicone, silicone pigments were stippled into the mould (figure 8), which created a textured leaf effect on the prosthetic and meant that less colouring was needed for the final image than originally thought. According to Debreceni (2013, p.228), “silicone is resistant to acids, bases, solvents, chemical, oils, and water.” In the industry, for these types of pieces foam latex could also be used instead of silicone depending on the scale and budget of the project, as Debreceni (2013, p.239) notes that “foam latex is extremely light, strong, and breathable.” Foam latex is easier to colour compared to silicone and a lot more breathable when actors are wearing them for a long period of time on a shoot but is not as durable as silicone over time.
References
Debreceni, T. (2013) Special effects makeup for stage and screen. Uk, Focal press.
Figures
Figure 1: Sculpt of front of the head (Gaylor,2021)


Figure 2: Back of head sculpt (Gaylor,2021)

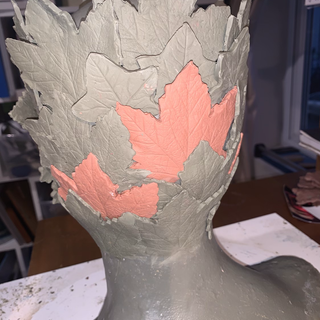
Figure 3: outer rim applied (Gaylor,2021)


Figure 4: silicone on the head piece (Gaylor,2021)


Figure 5: Gel coating on the head piece (Gaylor,2021)

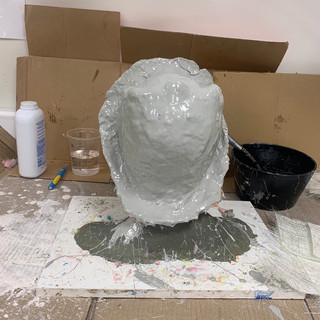
Figure 6: Fibreglass applied on back of the head (Gaylor,2021)


Figure 7: Silicone snap mould (Gaylor,2021)


Figure 8: Stippled silicone (Gaylor,2021)


Comments